
Part of being a longarm machine owner is the ability to do maintenance and repairs on your own machine. An ability to figure out why something is wrong and then figure out how to fix it is a big plus. In the 5 years that I have owned this A1 longarm, I have never had any issues that I couldn’t figure out on my own how to fix. Most of them had to do with regular maintenance (rotary hook, needle bar height, etc.). The machine I had before this one, however, I had torn it apart several times in the short two years I had it.
So, on a Tuesday evening, I was quilting merrily along when all of a sudden I heard this loud pop. It was loud enough that it startled me and nearly made me jump. As soon as that happened, my machine quit. Lights on, but no one home dead. I thought well maybe a fuse blew. So, I figured out how to replace that (first time ever) and that wasn’t it. I unplugged everything and plugged it back in. Still nothing. I checked the user manual, and went through a few suggestions. Nada. I went on Facebook and asked for help and got several suggestions, but still nothing. The next morning, I contacted support and was informed I needed a new motor box. And since I was getting a new motor box, they sent the updated index board and magnet. Randy at A1 said to take pics of all the cables and how they were attached and to call him when I got it back together and he’d walk me through things.
Well, I had never ever taken the back off of this machine. Ever. But, no big deal right? I took the back off to send pics to Randy so I knew what was in store. These are the “before” pics I sent to Randy so he’d know what kind of board he needed to send back.


I got the new parts on Friday. I work through the week (and can work from home if I need to – which I did on Wednesday to call support). So, I didn’t get started on taking the old stuff off and replacing it with new stuff until Friday evening. I did ok, until I had a couple of cables I didn’t know where to hook back up. Facebook to the rescue! I got the answer on all but one leftover cable. I also didn’t have a clue on how to replace the magnet; so, I took the day off on Monday and called Randy at A1. The extra cable was just that – an extra cable with nowhere to go. He walked me through replacing the magnet and index board. I had to make a trip to town to get a special allen wrench to unscrew the tiny screw that attached the index board to the housing. It needed a 1/16″ allen wrench and the smallest I had was 1/4″. I found one that small at our local hardware store and got back and was able to remove everything and put it back together.

magnet and index board. Index board is behind the cylinder that sets next to the machine. The pulley needed to come off, then I had access to the magnet behind it.
One more call to Randy Tuesday afternoon to help in getting the magnet positioned correctly and I was able to stitch. However, I found the more I stitched, the more I realized I didn’t have things quite right. By then, it was after 5 and support had closed. I sent off an email to Randy with a list of things that the machine was doing. I did manage to get a row of stitching done. I could work around the issues it was having.
So, I stayed home on Wednesday to talk to Randy again. This is where it gets crazy. The needle goes up and down based on the positioning of the magnet near the index board’s sensor. The index board needed to be scooched (yes that’s a word) just a smidge so that the magnet recognized it properly. To do that, I needed to take that pulley off and remove the front cylinder and loosen the two screws that held the index board to the machine. Simple, huh. Well, it would have been simple if , when I purchased that new allen wrench at the local hardware store, I could have bought one with a handle. The hardware store only had one option – a set of loose L-shaped wrenches. Which would have been fine IF I could have gotten it loose with my fingers. I needed more torque than my bare fingers would allow, so I used a pliers wrench to hold the little bitty allen wrench in order to turn it. Therein lies the root of all that came next. The screw head didn’t have a lot of depth to it, so that allen wrench wobbled around and quickly rounded out the screw. It rounded it out when it was partly unscrewed. I couldn’t screw it in and I couldn’t screw it out. I couldn’t rotate the cylinder to gain access to the set screw to remove the magnet. I was royally screwed.
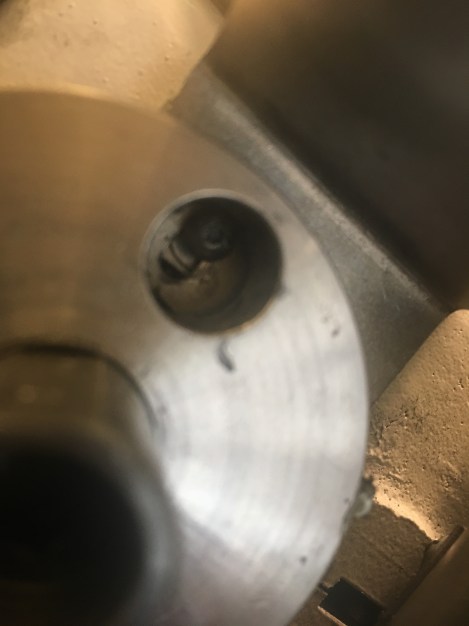
Screw with rounded out head. I tried needle nose pliers. I tried using a small rubber band to give the wrench something to grip. I literally tried everything google could think of .
So, I googled it and called around to some buddies and they all suggested getting a extractor bit to drill out the screw. So, off to Menards I went (40 minutes away) and purchased a Grab It micro extractor bit and got home at 8 p.m. and started again. O M G. I am not a mechanic. It literally was doing nothing. I put some cutting oil on it and still could not make a dent on it. My husband took pity on me and tried and he couldn’t do anything with it either. Finally, at 11 p.m., the screw broke in two and left over half of the shaft in the machine. I was defeated. I went to bed after numerous curses.


(Oh, and it turns out the shaft that the magnet slides on had a burr which made it impossible for me to remove the cylinder anyway – unless I had a gear puller, which I did not even know what that was. My husband said he had some pullers but they were all too big because he works on big stuff.)
I stayed home yet again. Facebook came to the rescue – Stewart Plank, the owner of A1, called around for a mechanic and put me in touch with one in Mattoon. But, after sending pictures of what I had done, that mechanic didn’t call me back. The shaft of that screw either needed to come out or a new hole had to be drilled. I threw in the towel and made arrangements to make a trip to Springfield, Missouri the next day. That’s a 5 1/2 hour drive one way.
I got up and left the house at 5:30 Thursday morning. Got to A1 and dropped off the machine with Randy. While he fixed it, I went shopping for a dress for my son-in-law’s wedding next month and had just sat down to eat lunch when Randy called to say he was done!
Back I went and he had got it all put back together and it was stitching like a dream again. Randy, you are seriously the BEST mechanic EVER! Stewart, give that guy a hefty bonus and raise! He’s worth his weight in sewing machines! He had to drill a new hole, and smooth off the shaft. He also replaced those screws with new ones they had just got in to replace that type of screw.

Randy with my A1 working like a dream again.
So, I got home at 8 p.m. and got it hooked back up on my frame and am back in business. I lost 10 days working on customer quilts, but did make some progress on my wholecloth design. I might actually get it done this year!
If anything like this ever happens again, I’m confident I can repair it myself; but, I think it’s worth the drive to Springfield, Missouri to just have Randy do it.

Nice to hear a success story. They seem to be few and far between these days.
And I thought I did some interesting repairs/adjustments. Nothing close to this. But so happy you are back stitchin!!