
This was a unique project. The customer (Maria) had some vintage tops that had been passed down to her and which I had quilted for her. But this quilt was already quilted. The problem? It was not big enough to use on a queen-sized bed. While I was hesitant to do anything to this beautiful hand-stitched quilt, I also realized the customer loved this quilt and wanted to use it – not store it away to look at on occasion. So what to do!? My first thought was to cut off the binding and add a large border to the sides. But I couldn’t bring myself to cut this quilt. What if I ruined it beyond repair. What if the quilt police came and arrested me for vandalizing vintage quilts!
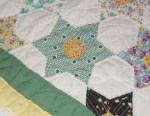
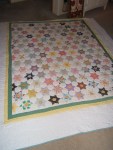
So, after much thinking and discussion with fellow quilters, I came to the conclusion that I could do both – keep the original quilt intact while adding borders to make this quilt the right size for the customer. I’m not sure of the pattern, but it reminds me of grandmother’s flower garden, except that the star pieces are pentagons. So, I guess it’s a 6-Pointed Pentagon Star, for lack of a better description. Here’s what I did:
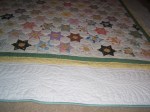
The quilt needed to be 20″ bigger on the width and 10″ more on the length. Many older antique and vintage quilts had only 3 borders, so I decided to add a 10″ border to both sides and to the bottom only. I felt this would give the quilt a more uniform appearance than if I had added 10″ to the sides and 5″ to the top and bottom border.
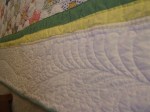
Once I had decided on that option, I had to decide how to quilt it. I knew I couldn’t load this on the longarm frame – the material was too fragile. There was one fabric that was disintegrating that also had to be repaired (more on this later). So, I loaded 100% pre-washed cotton fabric on the longarm in the longest width I needed and quilted the three borders. I marked the size of the border on the fabric and decided that a feather vine would look best with the quilt. Other options were crosshatching or swags, but the feather vines would take less time and cost the customer less money. I also used polyester batting since that was the type of batting that was used in the quilt.
Once the quilting was done, I cut off the excess and washed it again. This was an interesting process, because I thought I had allowed enough extra fabric to allow for shrinkage – plus the fabric had been washed once already. I found that I still got some shrinkage which caused my border to flow into the ends not exactly as I had envisioned. Next time- allow 4% extra for shrinkage!
Once that quilted piece was washed again, I cut the borders out (should have taken pics of this), leaving 1/2″ border on the top and bottom. I then sewed the border on to the sides first – back sides together – stitching in the ditch along the inside border of the binding of the original quilt. I then unfolded the quilt border and went back and stitched just on the inside of the outer edge of the binding. Sewing the binding down like this did two things – secured the old quilt to the new border and resulted in the binding becoming a new 1/2 border. See pics below.
Once the sides were attached, I trimmed the ends to match the ends of the quilt and attached the final border in the same manner. This is where my error in not allowing enough for shrinkage became apparent. I wanted the feather vine to flow to the edge of the bottom border, but it stopped a couple of inches shy. Not too noticeable, except to me of course.
I then used some vintage fabric that the customer had brought with the quilt to help in repairing some of the blocks and used it to bind the quilt. I really wanted to match that green – it’s close but not an exact match – in order to give the added borders more legitimacy for their existence (not an afterthought).
There was one fabric in particular on the quilt that was disintegrating – a yellow/green striped material. So, I made a template of the pentagon blocks that make up the star and found a scrap of vintage material from the stash and cut out enough to do 2 1/2 stars. I then hand-appliqued the pentagon blocks on top of the disintegrating material and hand-quilted them in place. There were a few other white hexagon blocks that were in need of mending also, which I repaired.
When it was done, I tried it out on my bed and it fit perfectly. I’m glad I left the top border off . The three borders hit the mattress at the right points and makes the quilt look really nice – you notice the quilt blocks – not the border. So, all in all, I saved a much-loved quilt while modifying it for the customer. If someone wants to in the future remove all the modifications they can and the original quilt will still be in place. That, I think was the most important part of this process — making sure I didn’t permanently disfigure this lovely old gem of a quilt. Thanks, Maria, for entrusting this gorgeous quilt to me.
-

- Deteriorating fabric
-
- Replacement material
-
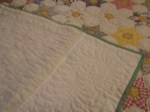
- Back of quilt

I think it is awesome and I can’t believe how much extra work you put into making this quilt be what it has become. Well done.
Sorry but these are hexagons, not pentagons. Hex = six sides. Penta = five sides.